
How to use ZOOM and Green Screen to create News Reader style videos

Using Zoom and a Green Screen, my colleague Tom Visscher and I created a ‘News Reader’ style video with a changing backdrop.
Dit artikel is overgenomen van Video Teaching, met toestemming van auteur Zac Woolfitt, docent bij InHolland.
Our first experiment resulted in this 'book review'.

 |
| Screen shot of 'News Reader' style video book review (with subtitles) |
Here’ how we did it.
Technical aspects
Zoom is a user friendly video conferencing system. With Zoom you can easily connect with your laptop or smartphone. Zoom has different licenses, free, pro, business or educational.
One of the nice features of the pro version, is that you can create a virtual background. In order to do so you’ll need a green screen or other color back drop. For the book reviews, we used several slides and uploaded them in advance into Zoom Pro.
How to use the virtual background in Zoom?
First save the PowerPoint slides as PNG or JPG files on your laptop and then add each slide to the Zoom system.
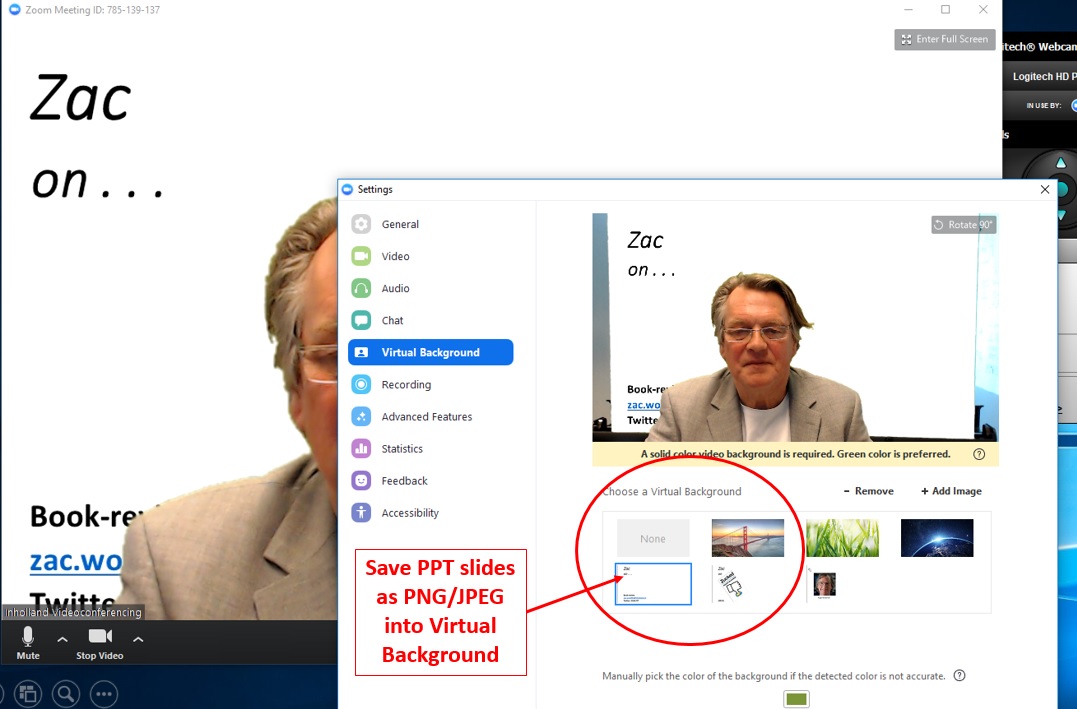 |
| Save each PPT slide as a PNG/JPEG. Then place them in the Zoom Virtual Background. |
The next step is to prepare your recording area. We used an improvised sheet of green paper on the wall (version 1):
 |
| Improvised Green Screen studio in Tom's office. |
For a more professional look, use an official green screen such as an portable ElGato.
 |
| Next timed we'll use the real thing. |
In this experiment we just used Tom’s office. Lighting however is important. If you don’t have professional studio lighting, then use natural northern daylight if available. This light is diffuse and gives good results.
I was the presenter and at the appropriate moment in the presentation, my colleague Tom clicked the next background image. The video file is saved into the Zoom system and is then automatically subtitled. The subtitles can be edited afterwards. The link can be distributed within the Zoom system. If you upload to another channel, e.g., You Tube, then you’ll need to re-do the subtitles in the new channel.
The advantage of using Zoom this way is that it is relatively uncomplicated. The finished video file is an MP4 which can be easily distributed.
Preparing and delivering the content
The goal was to spark interest in the viewer about the book. Should they explore these ideas further? Or even buy the book?
Here are the steps I took to prepare and deliver the content.
First, read the book. Then mark-up important sections in pencil with lots of underlining. Read it again quickly and select the most important sections of the book. Discuss the book’s main ideas with other people and develop a clearer overview of the key points.
Write a short summary in bullet points, and list key quotations from each chapter.
Keep your own opinion out of the story so as not to be too ‘biased’ in the eye of the viewer.
Making the slides
Now you are ready to develop the PowerPoint slides. Use a 16:9 format which works better in Zoom.
Apply the Multi Media principles of Richard Mayer. This can help reduce cognitive load.
To do so, I removed all redundant information. Kept the amount of text to an absolute minimum. Used a consistent, non-distracting, white background with plain black text. Designed a standard format with square (Instagram style) photos to ensure predictability and consistency. Added a small version of the cover (of the book being reviewed) next to the text to link the ideas to ‘brand’ each slide.
The images were searched for under creative commons creative commons. The aim is to keep the slides as simple as possible so I’m struggling with how to credit the original image source without distracting the viewer. Please share your tips, or ideas.
Recording the book review
Once the slides are finalized, practice telling the story in a colloquial manner. Keep the total down to five minutes. It is difficult to leave out super interesting aspects of the book! This requires discipline and practice.
Wear non-distracting clothes (e.g. a black t-shirt and jacket). This is neutral and helps to increase the viewer’s focus on the story and the images.
In order to sound natural, I don’t refer to notes in the presentation. Try to talk from memory. This means you may forget things. But it keeps the dialogue natural. Try not to use too many ‘erms’ and speech pauses.
Look directly into the camera and aim to maximize eye-contact with the viewer through the camera lens. I have a challenge with my glasses which can ‘flash’ the white background if I move my head from side to side. So I have to really concentrate on keeping my head still.
When talking, you can move closer or further to the camera to create a more dynamic presentation and to emphasise a certain point.
You can also interact with the images on the green screen that appear next to you. Look in their direction. Point or refer to them. This helps the viewer to focus on what is relevant. It adds variety to the presentation.
Bring the physical book with you. Hold it in front of the image of the book cover on the first background slide. This highlights the book. It provides a link between the reviewer and the book. You can also flick through the pages to show the book.
Relax, breathe deeply, and then record a few takes. After a few tries, you will have a sense of which one worked best. Select this one and upload the file as indicated above.
Reflections for improvement
For future iterations, several things could be improved on our first effort (Zac on ‘Zucked’).
If we record in a formal studio we could take the sound quality to the next level. Also, the green screen would be sharper around the edges. We could use additional lighting.
The script could be fully worked out in advance, word for word. A teleprompter could be used for the text. Since this is very time consuming, it may not be necessary for the ‘informal’ products we are making.
Standing up to record may be more dynamic and provide a more engaging screen presence. Sitting feels a little restricted.
Other tips…? Please share in the box below.
Have a good technical guy to hand!
With many thanks to Tom Visscher for suggesting this format, helping write the technical aspects of this blog and providing the photos.
We’ll continue to experiment with this format so watch this space...